Wednesday was my last day of summer freedom. I am officially back to school. I am not going to say anything negative about already being back at school because I am trying to mentally pump myself up for a new school year.
With that said, I had an absolutely amazing summer break. I played around and made some really fun, cute things that I wanted to share with you. Everything that I have made is a trial and error process. I am not a professional and do not pretend to be. Some of my creations do have imperfections and minor flaws. I like to think they are a reflection of myself....
First, I want to show you an idea that I got from Pinterest. If you aren't on pinterest, you need to be. You have to be invited, so if you would like to start an account let me know and I will send you an invite via email. It has so many "how to's" and "do it yourself" projects for the home and for parties. There is also a free app on the iPhone. I spend more time researching on pinterest than I do on facebook and that is saying something. Anyways, I found a picture of mason jars used as illuminaries and wanted to give it a try.

If you look on Craigslist in the Athens area under "free" or under materials for Arts and Crafts people have stuff like mason jars, old windows, used paints, etc. for free or practically nothing. Just be careful if you meet up with someone to get your purchases. There are some creepy people in the world.

So, I got these three mason jars and filled the bottoms with glass stones that I received in the bottom of a flower vase from a Valentine's Day gift or something. Then, I placed a small tea light candle on top of the glass stones. You probably don't want to place just the candle in the glass without a buffer like stones, sand or rocks because the glass could possibly get really hot and burn your hands and even break.
Next, I took hemp rope that I had from some jewelry making crafts and tied a bow around the top.

For the wire hanging part, I took wire from a picture hanging kit that someone gave to us when we got married and wrapped the wire around the lip of the mason jar and then made the handle. I know they aren't anything fancy, but I thought they looked pretty at night hanging from my shepherd's hooks. It gave my back deck a very relaxing and romantic feel. Cheap, easy, and pretty darn cute if you ask me.
Alright the next idea I had I got from Cherry Street Cottage. I really like this blog. She has a ton of "do it yourself" tutorials and ideas for your home and gifts for other people. I LOVE receiving handmade items from people. It just makes me feel special like they were actually thinking of me and making the gift only for me when it was being created. I don't know, maybe that is just my vanity coming out. Any who....I do enjoy a good homemade gift so I love all of the ideas that Jessica blogs about on Cherry Street. The link will take you straight to the fabric flowers tutorial.
I did find that when making these little rosettes that certain materials are easier to work with. Thicker upholstery materials are a little more difficult to work with because you do have to do a lot of folding. The thicker materials just did not want to stay put. In contrast, I also found that the slinkier, silkier materials make really small and tight roses. Either way, I had a blast trying the tutorial out and the more you make, the better your roses become!


Oh yeah, when completing the first steps of making the folds with the fabrics, I used the iron so that the folds would keep while I was rolling and folding. Otherwise, the fabrics kept coming undone and would make the flowers awkardly lumpy. The iron really made things easier and much neater.
Okay, next I have a sneak peek of something I am working on. They are not finished and I am not going to tell you what they will look like when they are completed. But...I am super excited.

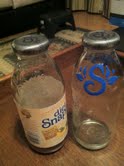
Obviously, they are old Snapple bottles. I realized while drinking my delcious Peach Tea that there are convenient little "S" designs on each bottle. Since my last name begins with an "S" I just found this extremely convenient. As you can see, I have painted the "S" with blue paint. That is all I am revealing now. Hopefully I will have time to finish at least one of the bottles by this weekend, but I make no promises at the moment. Because, remember? That's right.... I am back in the school saddle again.
No comments:
Post a Comment